Showing posts with label tasty Tuesday. Show all posts

CARAMEL APPLE BARK

What? 2 recipes in 2 days! Bringing back an occasional Tasty Tuesday because I’ve had so many recipes lately! I sure hope you saw the Pretzel Bites with Beer Cheese Dip recipe yesterday! My fav tailgating food recipe for sure! 


Its fall y’all and my favorite time to cook, bake and concoct new recipes! This one is so perfect and yummy for a Fall Day! and to use the bounty of apples you might have in your neck of the woods! 

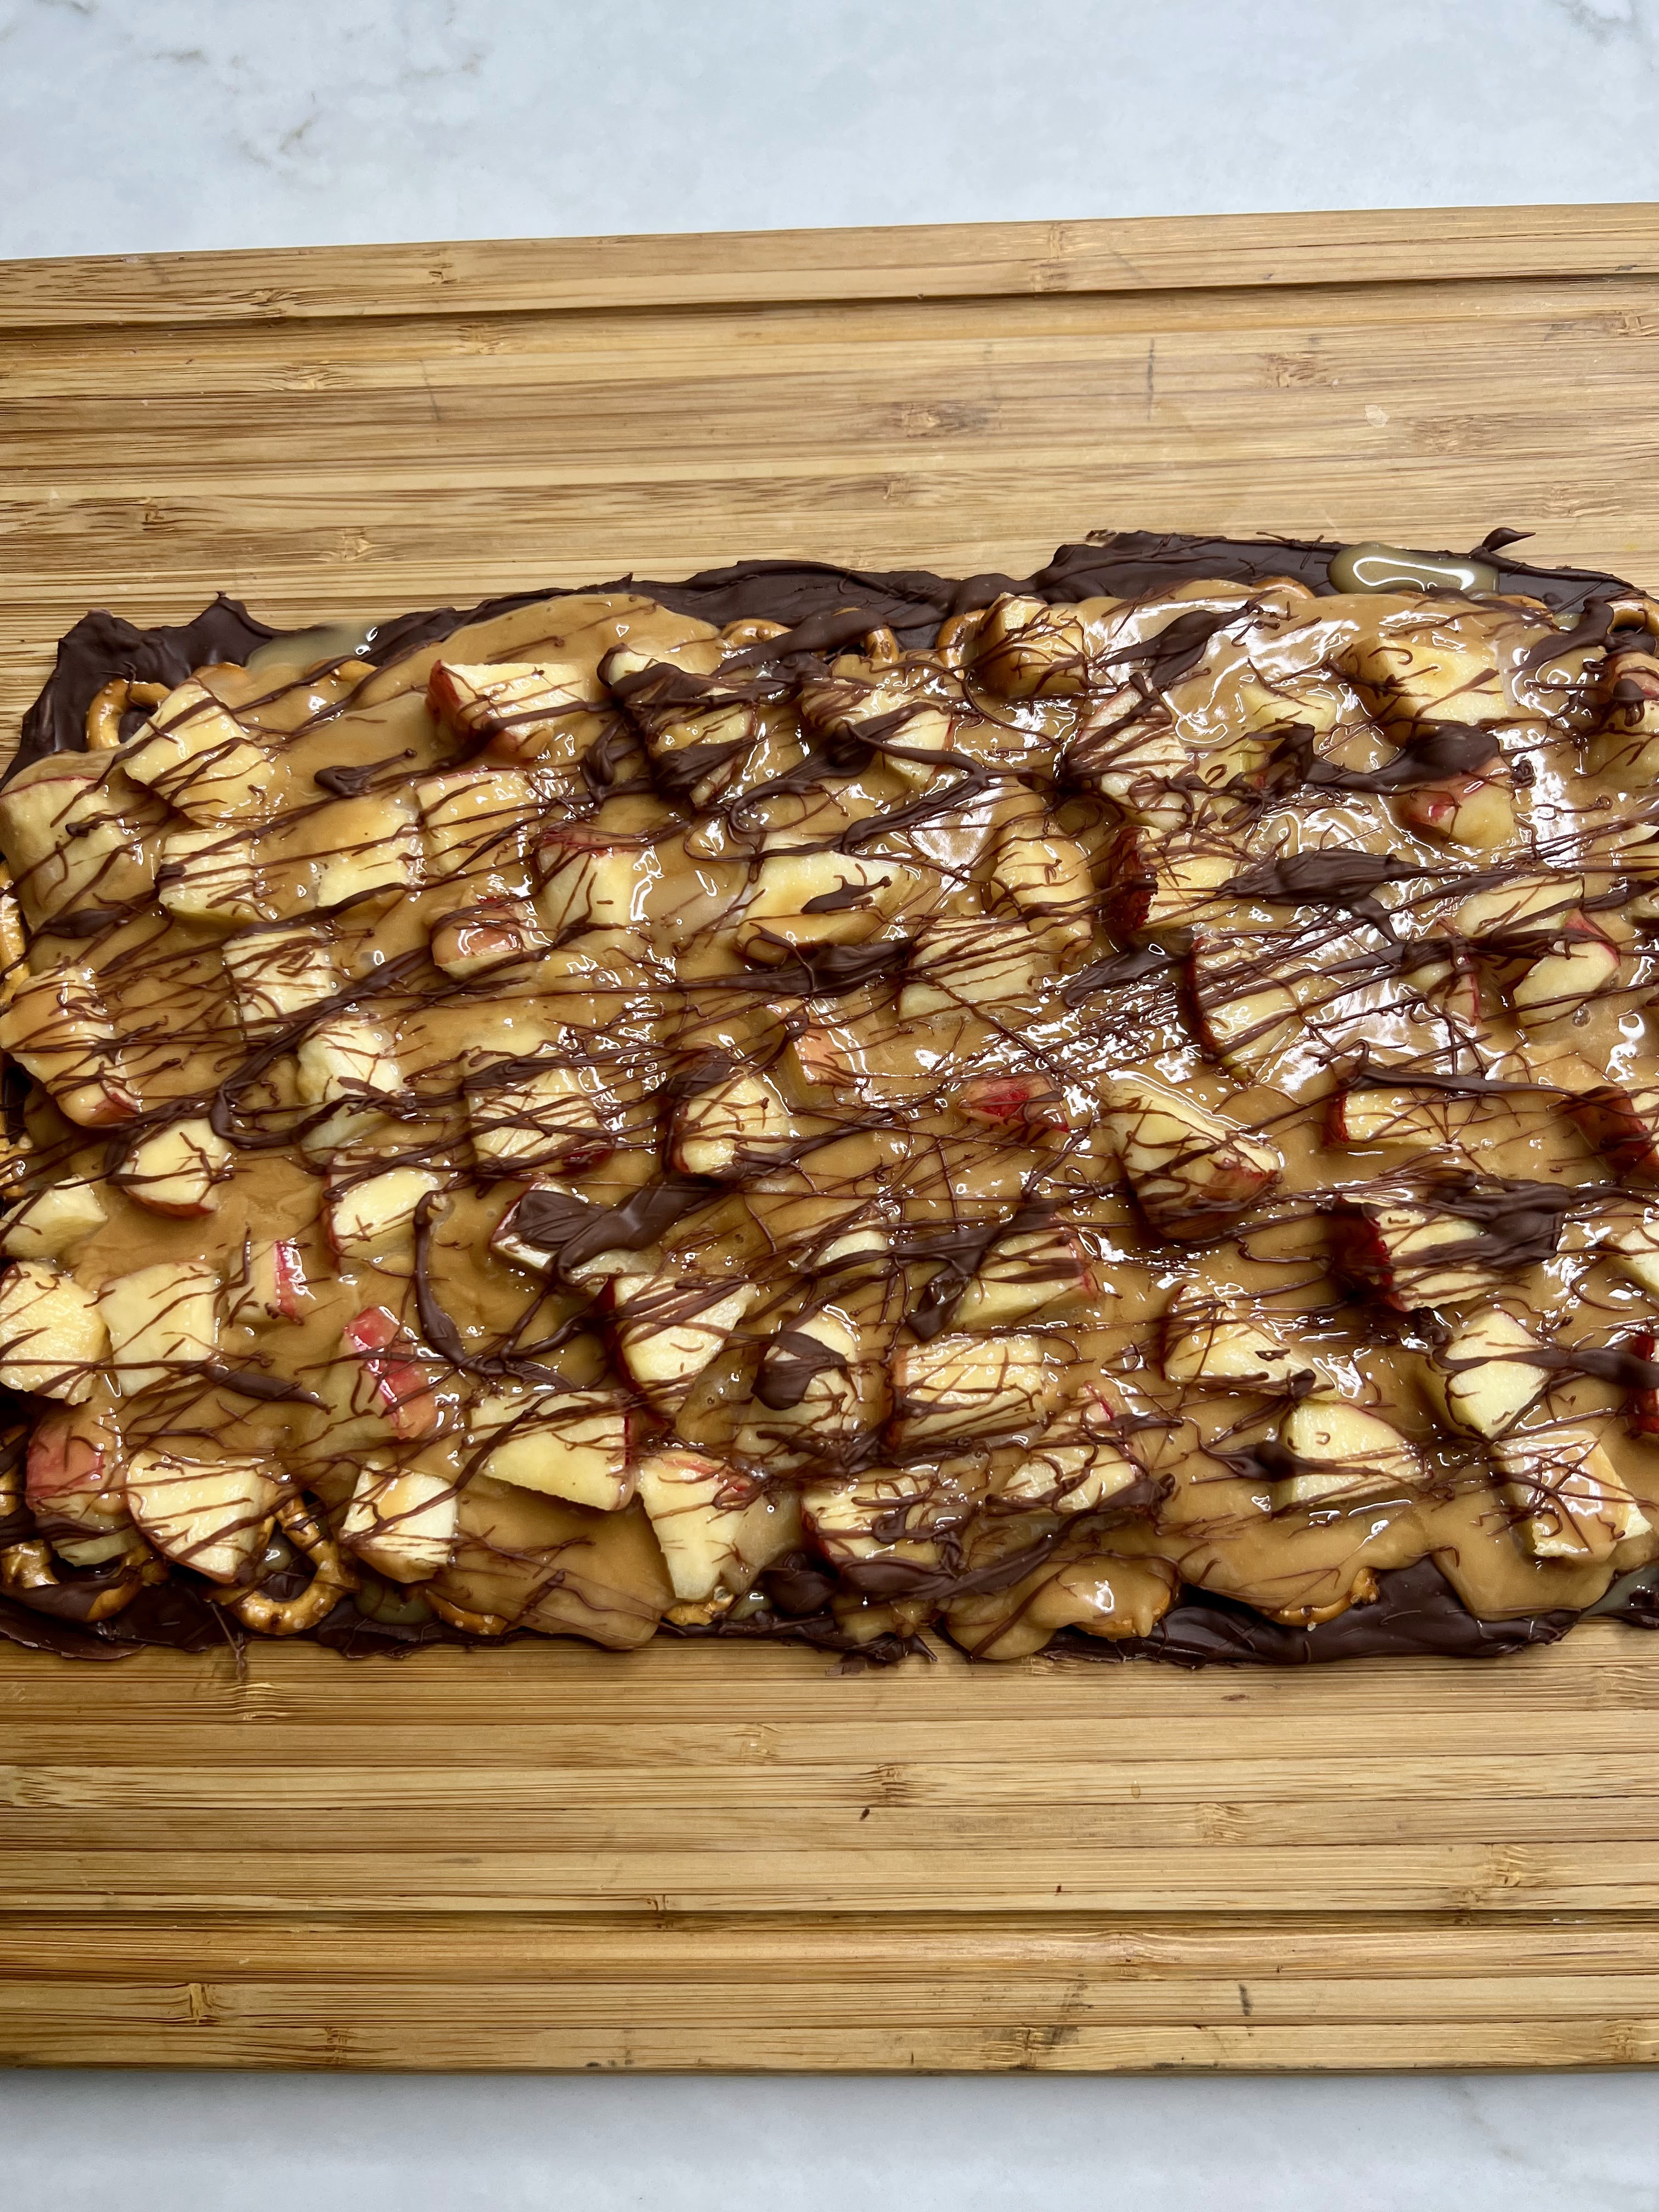
CARAMEL APPLE BARK 🍎🍏

The yumminess of a caramel apple but NO stickiness!!!!


What you'll need


CARAMEL APPLE BARK
Ingredients:
11.5 oz milk chocolate chips (save a few for melted drizzle on top)
1 apple, diced
11 oz bag caramel bits
1-1/2 cups tiny twist pretzels
Lemon
 
Directions:
1.   Pour the chocolate chips into a glass bowl. Microwave them in 30 second intervals, stirring in between each interval until the chocolate is completely melted and smooth.
2.   Line a cookie sheet with wax paper and use a spatula to spread the melted chocolate into the shape of a rectangle on top of the wax paper. The dimensions of the rectangle will end up being about 8"X12".
3.   Place the pretzels evenly on top of the chocolate.
4.   Dice the apple and use a paper towel to dab the apple pieces to absorb any extra moisture. Mix with some lemon to prevent browning. 
5.   Place caramel in a microwave-safe bowl. I like to add 2 tablespoons of milk or water to help thin out the caramel just a little bit. Microwave the caramel for one minute and then stir the mixture. Continue to microwave the caramel in 30 second intervals, stirring in between each interval until completely melted and smooth.
6.   Add the diced apples to the caramel and mix until well combined. Spoon the caramel/apple mixture on top of the pretzel layer.
7.   Drizzle a little more melted chocolate on top. Refrigerate for at least an hour before cutting or breaking into pieces. 


And I'll be back tomorrow with an 
UP NORTH Fall Leaf trip recap!!


xoxo


DATE PINWHEELS


Happy Tasty Tuesday friends! That’s right! Tasty Tuesday is back for one very special holiday recipe! There are a couple of holiday sweet treats my mom makes, that I request every year. Those are her white sour cream fudge and these Date Pinwheels! This recipe is from one of my favorite cookbooks that I used to love browsing through when I was a little girl. They are just the right amount of soft cookie and chewy date filling!


I cannot even tell you how much I love these. And truth is, these photos are from last year when I forgot to share this recipe and I didn’t get enough of them because I was eating the cookies so fast. I have included a photo of the ingredients and my mom and I are happy to share the recipe with you.


She hasn’t made them for me yet this year but I am anxiously awaiting them and so are my taste buds. But she did take a pic of all the ingredients for these, you will LOVE them!!
 

What you'll need

DATE PINWHEELS
INGREDIENTS
3/4 lb pitted dates, chopped
1/3 cup granulated sugar
1/3 cup water
1 cup light brown sugar, packed
1/4 cup shortening
1/4 cup butter, softened
1 egg
1/2 teaspoon vanilla
1 3/4 cup all-purpose flour
1/4 teaspoon salt

DIRECTIONS
Cook dates, sugar and water, stirring constantly, until thickened; cool.
Mix brown sugar, shortening, butter, egg and vanilla until smooth. Stir in flour and salt. Divide dough into halves. Roll each half in a rectangle, 11x7 inches, on waxed paper. Spread half the date filling on each rectangle. Roll up tightly, beginning at 11-inch side. Pinch edge of dough into the roll to seal. Wrap and refrigerate at least 4 hours. Heat oven to 350 degrees. Cut rolls into ¼ inch slices. Place about 1 inch apart on ungreased cookie sheet. Bake until light brown, about 12 minutes. Immediately remove from cookie sheet. Makes about 5 dozen.


Hope you enjoy a sweet treat today my sweet friends!!


LINKING-UP with  // Love your Creativity // Hello Monday // Inspire Me Tuesday  

xoxo


THUMBELINA COOKIES

These precious Thumbelina cookies go way way back! I have fun memories of my mom and spooning the colored frosting into the little dents of the buttery and tasty cookies! Tasty Tuesday at it's best with cookies!


They always add that perfect touch of color to all my cookie platters and trays as well. They are so tasty that sometimes I pop the whole thing into my mouth as you can make them kind of tiny and almost bite sized!


Plus, I always loved the fairytale Thumbelina and these petite little cookies carry that name perfectly! They truly are so incredibly yummy. I make a couple other Dent cookies but these are definitely my favorite and one of the many baking traditions of the Christmas season!


THUMBELINA COOKIES
INGREDIENTS
1/2 cup butter, softened
1/4 cup white sugar
1 egg yolk, beaten
1 teaspoon vanilla
1 cup all-purpose flour
1/2 teaspoon salt

FROSTING
1/2 cup butter, softened
1 1/2 cup powdered sugar
2 tsp vanilla
red and green food colorings

DIRECTIONS
Preheat oven to 350°. Cream together the butter and sugar. Beat in egg yolk and vanilla. Blend in the flour and salt. Shape into 1-inch balls. Place on ungreased cookie sheet. Dent center of each ball. Bake for 5 minutes. Remove from the oven, dent center again, and bake for 8 to 10 minutes longer. Cool. For frosting, beat first 3 ingredients until fluffy. Divide frosting in half by placing in two different bowls. Tint each half, one with red food coloring and one with green food coloring to your desired color. Fill in dents with frosting.

Before frosting

My desired tints

So cute and delish!


Sorry, I did not post yesterday. I was in Chicago at a TV station and holiday luncheon with some blogging friends and will share more on Friday. Come back tomorrow for a sweet Style Six festive post and I hope you all have a fabulous day!

MY BIRTHDAY PIE....KEY LIME

Today is my Birthday and this is my Favorite PIE! I have been a Forever fan of Key Lime martinis. My mom went to a get together with her friends several years back and had the most amazing Key Lime pie so she decided to surprise me with it one year for my birthday! Well, can I tell you it’s probably the pie and dessert that I look forward to most each year! It is now a tradition. You guys, I have had a lot of pies, but I have never had a Key Lime pie as good as my mom’s! We think that it is the Nellie and Joe’s lime juice, which is like no other, as well as the sweetened condensed milk. If you like Key lime pie, this is a must! And the simplicity and ease of making it cannot be beat!


Throwback Cheers with my favorite Martini!

What You'll Need

Mom’s Key Lime Pie 
INGREDIENTS
Graham Cracker Crust
1 1/2 cups Graham cracker crumbs
1/3 cup sugar
6 Tablespoons Butter, melted

Pie Filling
1 (14 oz) can sweetened condensed milk
3 egg yolks
1/2 cup Nellie and Joe’s Key West Lime Juice

DIRECTIONS 

Preheat Oven to 350 degrees. Combine crust ingredients and press into a 9” pie dish. Bake crust for 6-8 minutes. Combine condensed milk, egg yolks and lime juice. Blend until smooth. Pour filling into pie shell and bake for 15 minutes. Allow to stand 10 minutes before refrigerating. Just before serving, top with whipped cream and garnish with lime slices.


Even if aging can be tough and frustrating at times, life still gets better with age!! 
 BUY DRESS HERE // BALLOONS HERE & HERE

As you may know, yesterday was suppose to be spent shopping and lunching with my sweet mama but a darn dump truck running a red light nixed that but She's ok and thank you for your thoughts and Prayers! Well hit the stores next week when she feels better! Tomorrow, I am having lunch and more shop time with a dear friend. Today, I am spending quietly to reflect on my blessed life and tonight Mr. Nine is taking me to the restaurant voted number one in the state, which happens to be 10 minutes from our house. I cannot wait to take my time getting all dolled up and have a wonderful birthday meal with my man!

HAPPY TASTY TUESDAY!!


MINI CADBURY CREME EGG CUPCAKES

Aren’t they pretty? I know many of you are not Cadbury Creme Egg fans but these mini cupcakes are scrumptious! The mini egg hidden inside holds its shape but the middle takes on a more Carmel like taste and texture. While I don’t often use a boxed cake mix, I decided to doctor this up by adding pudding to the mix and altering the ingredients a bit. It makes for the moistest cake and tastes so much more like homemade. This makes a lot of batter so not only did I make cupcakes, I made a single layer 8x8 as well. I was so happy to find sweet pastel gel food colorings that make the prettiest color. I was tickled pink with how these cuties turned out. The perfect little mini Easter treat! So sweet! 


What you'll need

Mini Cadbury Creme Egg Cupcakes
INGREDIENTS 
Cake
1 box chocolate cake mix
1 small box instant chocolate pudding 
4 eggs
1 cup canola oil 
1 cup sour cream
1/2 cup Milk
1 teaspoon vanilla
Pinch of Salt

Frosting 
1 stick unsalted butter, softened 
3-4 cups Powdered Sugar
1 Tablespoon Milk
1 teaspoon Vanilla
1/4 teaspoon Almond extract 
1/8 teaspoon Salt

DIRECTIONS
Preheat oven per directions for cupcakes on the back of the cake mix box. Mix all the cake ingredients in a large mixing bowl with a mixing spoon and stir just until dry and wet ingredients are combined. Unwrap the mini chocolate creme eggs. Line mini muffin tin. With a small spoon, spoon about half bath into each liner. Then place a mini egg in each, narrow part of egg up. Spoon enough batter onto just to cover. Since they are mini, I did reduce baking time by 8-10 minutes per the box. Test with toothpick when finished and adjust time as needed. For the frosting: With a mixer in a medium bowl, mix the butter, milk, vanilla & almond extract until creamy. Mix in the salt. Then, slow mix in the powered sugar in increments. Add more to less for desired frosting consistency. Divide into smaller bowls, depending in how many colors you want and add 1-2 drops of food coloring to each bowl of frosting. When cupcakes are cool, frost as desired. 

If you want more detail, go to my Instagram and check out my Food Highlights for video of making the cupcakes.


HAPPY TASTY TUESDAY
SWEET PEEPS!!

SHEET PAN MONGOLIAN BEEF

It is very rare that we have red meat at home. The occasional red meat I do have, is usually in a burger form at a restaurant now and then or the one steak I order a year at Ruth Chris. It’s not that I don’t like red meat, I love it! I just try to keep it in moderation for myself and my family. However, this Mongolian Beef recipe made my indulgence of red meat from the flank steak incredibly worth it! It was out of this world delicious! I first saw this recipe on Danielle's Blog talking about how much her family loved it and I know mine would loved it too. So, I decided to give it a try myself with some tweaks. What I love most about it? It’s one of those sheet pan meals that packs the flavor and is super easy clean up. 
It was so good that I did not even need rice or any kind of carb with mine.


What you'll need

Sheet Pan Mongolian Beef
INGREDIENTS 
1-pound flank steak
1-pound fresh green beans, trimmed and halved 
1/4 cup cornstarch 
4 tablespoons coconut oil, divided
1/2 teaspoon ground ginger
4 teaspoons minced garlic
1/3 cup low-sodium soy sauce
1/3 cup brown sugar
3 tablespoons red cooking wine
1/2 teaspoon ground black pepper
3-4 scallions, chopped

DIRECTIONS
Preheat the oven to 450°. Slice the flank steak against the grain into small thin strips. Toss the steak in a bowl with corn starch. Spread the trimmed green beans out on a large rimmed baking sheet and drizzle with 2 tablespoons of the coconut oil that has been melted. Sprinkle with some ground black pepper. Roast the green beans for five minutes. Push the green beans to the sides of the pan and spread the flank steak strips across the center in a single layer. Drizzle the steak with the remaining 2 tablespoons of melted coconut oil and cook in the oven for 8 more minutes. Meanwhile, whisk together the garlic, brown sugar, ginger, soy sauce, cooking wine and ground black pepper together. Remove the sheet pan from the oven and pour the sauce over the steak and green beans. Bake again for about another 7 minutes. Remove the pan from the oven sprinkle with the chopped scallions and serve.


Where are my Meat Lovers?
HAPPY TASTY TUESDAY!!


xoxo


BLOG DESIGN BY DESIGNER BLOGS